Tub-to-Shower Conversion: A Practical Guide to Planning a Safer, More Comfortable Bathroom
Key Takeaways
- A tub-to-shower conversion can make everyday bathing more convenient and easier to navigate.
- The best layouts consider household routines, available space, drainage, lighting, storage, and long-term needs.
- Low thresholds, grab bars, seating, handheld showerheads, and slip-resistant surfaces can improve usability.
- Homeowners should evaluate whether removing the only bathtub will affect children, guests, pets, or future resale preferences.
- Waterproofing, ventilation, permits, and a detailed written scope are as important as fixtures and finishes.
Why Homeowners Choose a Tub-to-Shower Conversion
Many homeowners have a bathtub that receives little use, while the high tub wall makes entering and leaving the shower less comfortable. A tub to shower remodel can replace that underused fixture with a bathing space designed around daily routines, available space, and preferred features.
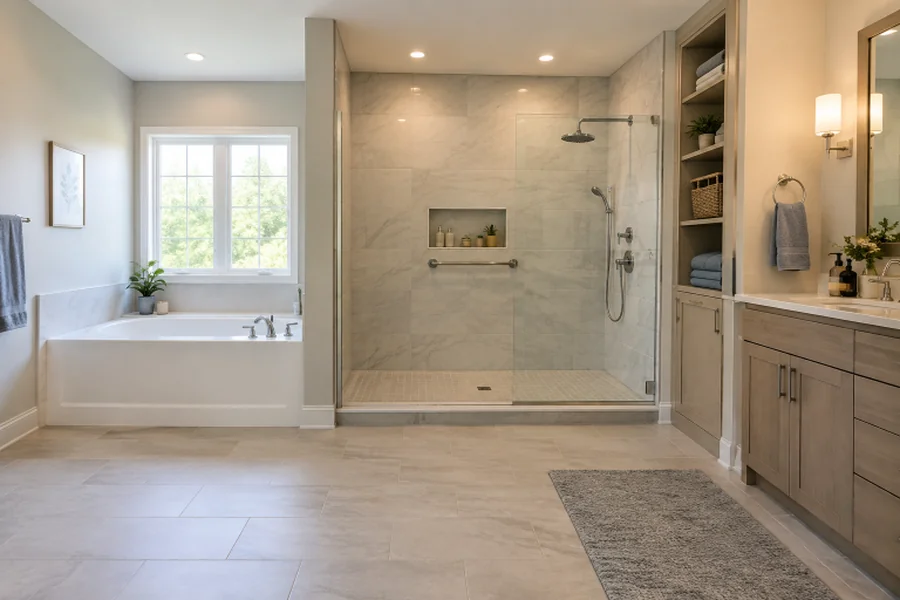
The goal is not simply to update the bathroom’s appearance. A well-planned conversion can improve access, simplify cleaning, create more useful storage, and make the room feel more open. Keeping the new shower near the existing tub footprint may also limit the amount of plumbing that needs to be relocated.
Deciding Whether a Shower Fits the Household
Before removing a tub, consider everyone who uses the home now and who may use it later. A shower can be an appealing option for adults who prefer quick bathing, people who find stepping over a tub wall difficult, or homeowners planning to remain in place for years. A bathtub may still be practical for young children, pet bathing, guests, or anyone who enjoys soaking.
Ask a few straightforward questions before finalizing the design:
- Is there another bathtub elsewhere in the home?
- Will children, visitors, or pets regularly need a tub?
- Could future mobility needs change the preferred entry style?
- Will a caregiver need space to assist a user?
- Would a seat, a handheld showerhead, or a wider entry make the room easier to use?
Measurements and Conditions to Review First
Accurate measurements help prevent design changes after materials have been ordered. Measure the tub alcove, ceiling height, door swing, nearby fixtures, and clear walking space. Note the positions of the drain, water supply lines, electrical outlets, switches, and exhaust fan.
It is also wise to look for signs of moisture damage before the project begins. Soft flooring, loose wall finishes, stained drywall, cracked caulk, musty odors, or recurring mildew can indicate the need for repairs behind the existing tub surround. Discovering and correcting those issues before the shower is enclosed protects the new work.
Choosing the Right Shower Entry
The shower entry affects appearance, comfort, drainage, and construction requirements. A standard curb effectively contains water, while a low-threshold shower reduces the step into the bathing area. A curbless design creates a more continuous floor transition, but it requires especially careful attention to floor slope, waterproofing, and drain placement.
- Low-threshold shower: A practical option for easier entry while retaining a small water barrier.
- Curbless shower: A level-entry design that may support easier use with mobility equipment when the room and floor structure allow.
- Transfer shower: A layout that prioritizes seated movement between a wheelchair or shower chair and a shower seat.
- Roll-in shower: A larger open-entry option that may require additional room and specialized drainage planning.
Safety Features to Plan Before Construction
Safety features are most effective when they are included in the original layout rather than added after the walls are finished. The CDC recommends home changes such as adding grab bars inside and outside a tub or shower, improving lighting, and removing trip hazards. These considerations can help homeowners build a bathroom that feels more secure without sacrificing comfort.
Discuss these options during the design phase:
- Grab bars anchored into the proper wall blocking.
- Reinforcement inside walls for future grab-bar installation.
- A built-in bench or fold-down seat.
- A handheld showerhead on an adjustable slide bar.
- Controls are placed where they can be reached without standing directly under the spray.
- Slip-resistant shower flooring and adequate lighting at the entry.
- Enough clearance for a shower chair or caregiver assistance when needed.
Materials, Waterproofing, and Ventilation
Material selection affects the shower’s appearance, maintenance routine, and number of seams. Tile offers broad design flexibility but includes grout lines that need regular care. Acrylic and composite wall panels typically use fewer seams, which can simplify cleaning. Natural stone may require sealing and product-specific maintenance.
Regardless of the finish material, water management should be a central part of the project. The shower base, drain connection, wall membrane, corners, fixture openings, and enclosure must work together as a complete waterproofing system. The shower floor also needs a consistent slope toward the drain so water does not collect in low areas.
Ventilation deserves the same attention. A working exhaust fan helps remove moisture after bathing, while suitable lighting makes the room easier to navigate. For homeowners considering accessibility-focused dimensions, the ADA accessibility standards provide useful reference points for features such as clear floor space, controls, and shower configurations.
Budgeting and Installation Expectations
Tub-to-shower conversion costs vary because conditions behind the walls are not always visible before demolition. The scope may include removal of the existing tub, plumbing adjustments, subfloor repairs, framing, waterproofing, wall materials, fixtures, glass, permits, and cleanup.
A written estimate should clearly identify what is included. Look for separate descriptions of demolition, debris removal, plumbing, drainage, surface preparation, waterproofing, shower base installation, wall finishes, fixtures, storage, safety features, enclosure work, inspections, and warranty terms. Ask how hidden damage or code-related repairs will be handled if they are discovered.
Most projects follow a similar sequence: the contractor confirms measurements, protects nearby surfaces, removes the tub and old surround, inspects the structure and plumbing, completes needed repairs, installs the base and waterproofing, adds finishes and fixtures, tests drainage and seals, and completes final cleanup or inspections.
Common Questions and Final Checklist
Can any bathtub be converted into a shower?
Many tub spaces can be converted, but the final design depends on room dimensions, floor structure, plumbing, drainage, and local requirements. An on-site assessment helps identify practical limits before work starts.
Should a home keep at least one bathtub?
That decision depends on the household. Keeping a tub in another bathroom can preserve flexibility for children, guests, pets, and future preferences.
Are permits required?
Permit requirements vary by location and project scope. Plumbing, electrical, ventilation, structural, and drainage changes may require approval or inspection.
Before approving the project, confirm that the layout meets household needs, the entry is comfortable, safety features are included, materials are manageable to maintain, waterproofing details are clear, ventilation is adequate, and responsibility for permits and cleanup is assigned in writing. A carefully planned conversion can create a bathroom that is easier to use today and better prepared for changing needs over time.